
FAQ

- What quality do I get?
- From which quantities can you order from us?
- Are other profile dimensions also available?
- How are your scarf joints cut?
- How are your glued scarf joints together?
- How do I proceed with woodfenders/bump stripes during installation?
- Which screws do you prefer for mounting the bump strips?
- What can I do, if I do not get pushed down the woodfender moldings?
- Is it possible to mount wooden bump stripes to all yachts?

What quality do I get?
All moldings are free of branches, cracks and have no sapwood on. The surfaces are fine sanded.By this profile, we reserve the right, to deliver up to 10% longer moldings than ordered and settle.
From which quantities can you order from us?
With us, there is no minimum order quantity, so you can also order small pieces such as: 3x200mm length (or shorter).(Please note that we may calculate a minimum quantity surcharge for this profile).
Are other profile dimensions also available?
Yes, we can also produce these profiles in other dimensions (also in smaller quantities).For the production we need a sketch of the cross section or you send us a sample.
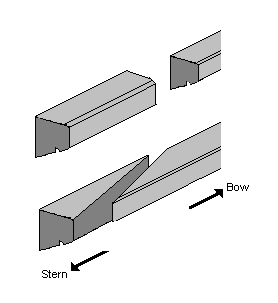
How are your scarf joints cut?
The scarf joints are cut in a ratio of about 1:10, which means that the bevel edge get 10 times the length of the strip cross-section, so that you can be sure to get a permanent gluing.The course of each scarf joint takes place from the inner edge ship's side to toward the outer edge at the stern side.
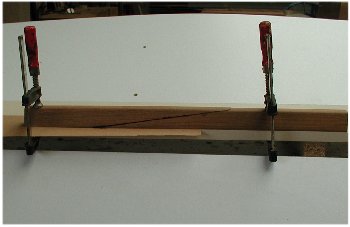
How are your glued scarf joints together?
We would like to introduce you to a simple method of gluing a scarf joint here.Take a piece of chipboard or plywood as a base and fix a part of the scarf joint with one or two screw clamps exactly at the cutting edge of the base.
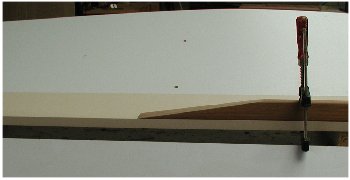
Clean the shaft and place a piece of paper or foil underneath the woodfender, so that nothing stick anything after the gluing process.
Apply the seawater-resistant epoxy thinly on both joints.
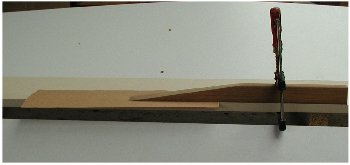


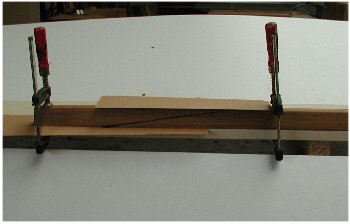
Now, also fix the second part of the bump strip at the cutting edge, so that the scarf joins are exactly on top of each other.
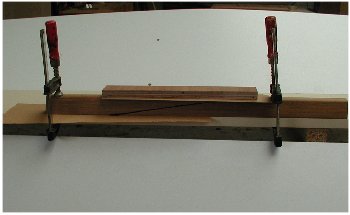
As pressure block, you can use another smaller piece of board. But make sure that it is slightly longer than the scarf join and lay here also a piece of foil or paper between pressure block and scarf join.
With three or four screw clamps, the actual pressure on the scarf join is now exercised. If the glue sticks out on both sides over the entire length of the scarf join, then is is a good sign. Wipe off the excess adhesive with a wet cloth and carefully check(!), that the ends of the strips are actually close together.
If necessary, place additional screw clamps.
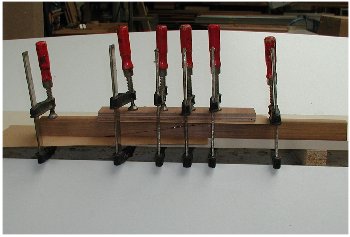
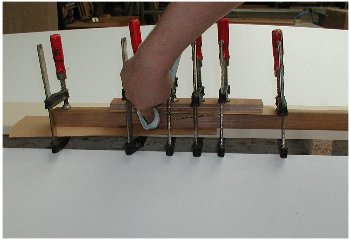
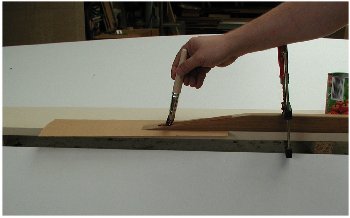
Allow the clamps to sit least 12 hours before removing them.
After this, the scarf joins should be lightly sanded.
How do I proceed with woodfenders/bump strips during installation?
The scarf joins of the bump strips must first glued, because how longer the strips are, so much better you can adjust the strip later paralell to the ship hulk. Are the joints have been glued, the woodenfender should be mounted dry on the hulk and fixed with a few screws. Make sure that you start mounting at the largest bend of the ship, otherwise you may find the rest of the strip too short and you will not have enough leverage to pull the strip around the ship hulk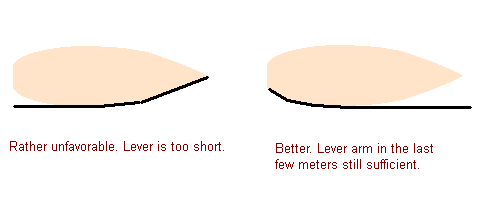
Mark the bump strip on the hulk on top and bottom with a fine pin - and tear also the remaining holes. Remove the strip again, sand the surface (where the strip should sit) and clean it again thoroughly. Apply a permanently elastic adhesive (such as Sikaflex) with a notched trowel exactly between the two markings before you start the actual final assembly.
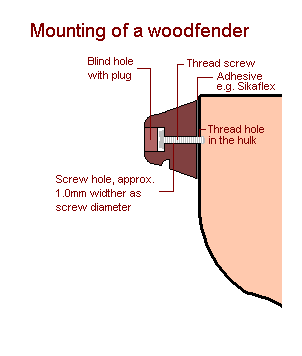
Which screws do you prefer for mounting the bump strips?
We recommend thread screws, because drywall screws are more likely to break the gelcoat. But do not worry, you do not have to disassemble your interior panelling, to counter the screws with nuts on the other side. Simply drill a hole from the outside and cut a thread with a tap in a second step. In addition to protecting your interior panelling, it also has the charm to press very carefully the woodfender against the hulk, turn by turn.
What can I do, if I do not get pushed down the woodfender moldings?
There is still a little trick when the wood is a little bit renitent. Keep a few very wet rags and a hot iron ready. Place the wet rags on the restive place and then hold the iron on top. This damp the wood and makes the cell structure of the wood smoother. You will see, the strip will fit smart to the ship hulk.